The word "khana" in Indian Khana Made Easy means food. So come on, let's explore and cook some easy Indian food together including gluten-free and vegan dishes.

.

Showing posts with label yogurt. Show all posts

February 26, 2022

Vegetable Medley and Tandoori Tofu Pita Boats

It's been 4 months since I started the Noom diet and it's been an eye opener. I debated for months and researched various diet plans before I chose Noom. Noom helps you make better food choices as well as your health goals through a combination of psychology, technology, and human coaching. It's been a struggle for the last 4 months, but I lost 21 pounds so far. I have 9 more pounds to lose to reach my weight goal.  

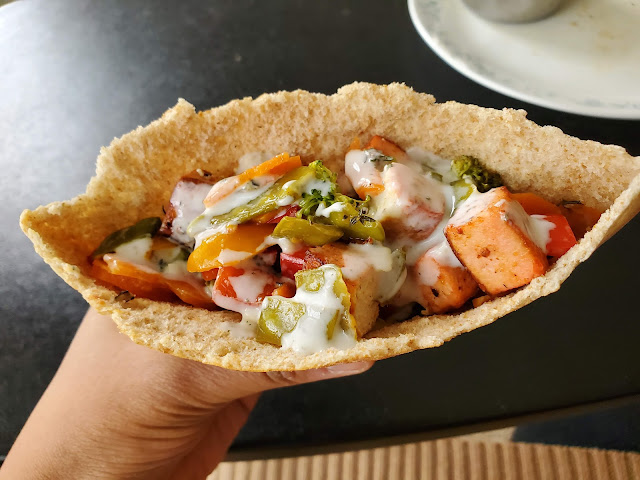
Here's what I learned and why I've been able to stay on track. I'm eating more vegetables, checking calories and buying foods that have little or no added sugars. I'm also doing meal prep on the weekends for the week ahead. A good example of one of the dishes I make a lot is Vegetable Medley and Tandoori Tofu boats. This dish full of flavor and it keeps me satisfied. I have been eating these boats for lunch and dinner. Aren't you dying to find out how to make them? 

Scroll down for details...


Ingredients

  • 4 whole wheat pitas
  • 8 - 10oz Extra firm Tofu, dab water with towel and cut into 1" cubes
  • 2 Tbsp Tandoori paste (we used Deep brand)
  • 1/2 lb. or 3 cups Broccoli florets, cut to 1" size and stems peeled and chopped
  • 1 medium Carrot, peeled and sliced into thin slices
  • 1/3 lb. Snow peas, stringed and chopped into 1/2 pieces
  • 1 large Red Bell Pepper, remove seeds and cut into 1 cm pieces
  • 1/2 cup Cherry Tomatoes, sliced into half
  • 7-8 stems of Thyme, leaves pulled
  • 1/2 to 1 Tbsp Balsamic Vinegar
  • 1 Tbsp Olive oil
  • 2 grinder rounds of Black Pepper 
  • 2 pinches of Salt


Procedure
  1. Heat 1 tsp oil in a non-stick pan on low medium heat, add Tofu pieces and Tandoori paste and gently stir around for the paste to coat the pieces. Pan fry the tofu on low flame by mixing intermittently turning the tofu pieces to fry on all sides. It take 5-7 min. Transfer tofu into a bowl.
  2. In a large microwavable container add Broccoli, Carrots and Snow peas, sprinkle a pinch of salt and microwave the veggies with a lid for 2-3 min based on your appliance wattage. 
  3. Add chopped tomatoes, thyme, red bell pepper, balsamic vinegar, olive oil, black pepper powder and another pinch of salt to the veggies from above. Mix gently to coat the veggie salad well.
  4. Carefully cut the pita into half and open the pocket. Place 5-6 pieces of Tandoori tofu and then fill it up with the veggie salad. Then top up the pita pocket/boat with some yogurt dip and enjoy the fresh and flavorful taste. 


I started making these boats at home and my husband loves it. It's filling and healthy. Quick tip: I use about 1-1.25 cups of the vegetable salad per pita. It's up to you how much you want to stuff your pita. You can also spread some hummus in the pita for more flavor. Overall, I really like this combination because it's hearty and has all good ingredients. 

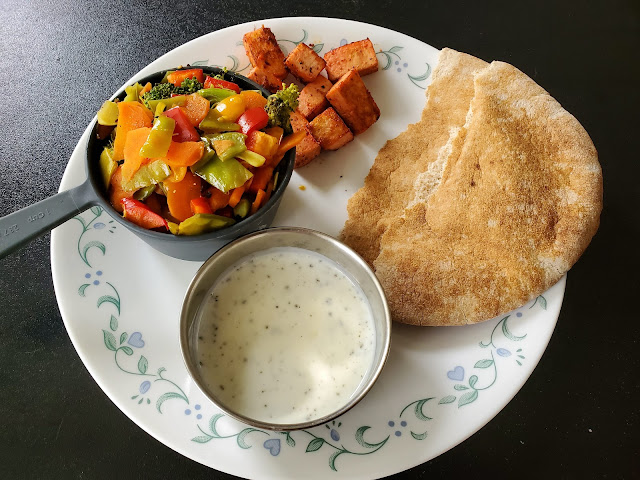
Below is a bonus recipe for the Garlic Yogurt Sauce that complements the veggie boats. Enjoy!  


Ingredients

  • 1/2 cup plain yogurt (Whole or low fat), whisked to smooth with 1 Tbsp. water 
  • 1 clove garlic, mince finely
  • 1 tsp lemon juice 
  • 1/2 tsp dry mint crushed                       
  • 2 or 3 grinder rounds of Black pepper                                          
  • Salt, as needed
Mix all items together until well blended. Adjust the salt and lemon per your taste. 

Have questions?? Post a comment or send us a DM on TwitterFacebook or Instagram. We love hearing from our readers. 

February 25, 2021

Air Fried Tandoori Tofu Chops

Do you remember our posts on 'Evolution of the Kitchen Gadgets'? Just like humans, even kitchen gadgets go through evolution. They get better with time and easier to use. 

We recently acquired an Air Fryer to reduce the amount of oil used to 'fry' or make our favorite dishes. Who wouldn't want to make restaurant-quality food at home? Below is one of our favorite Tandoori Tofu appetizers with our new kitchen toy. 

We hope you like it as much as we do. This appetizer is easy to make and requires few ingredients. 


Ingredients

  • 6 oz Extra Firm Tofu
  • 2 Tbsp Tandoori paste
  • 3 Tbsp thick yogurt
  • 1 Tbsp Vegetable oil
  • Few sprigs of fresh coriander, finely chopped (optional)

Procedure

1) Drain the water from the yogurt tub and dab the tofu block gently patting it down on a towel. Place the block on a small towel or paper towel and microwave it for 45 seconds to 1 minute (based on your microwave wattage) and dab the oozed water again. Cut the tofu into 1" cubes. 

2) In a bowl, add tandoori paste, yogurt, and oil. Mix well. Add the cubes into the bowl and gently toss the cubes to be coated with the paste. Cover the bowl and let it marinate in the refrigerator for 4 to 5 hours. 


3) Line the Air Fryer tray with parchment paper and transfer the marinated tofu cubes onto the parchment paper and align them in a single row, not touching each other. 

4) Set the Air Fryer temperature to 325°F and timer for 20 minutes. Insert the tray and air-fry for the set time. When done, transfer them into a serving tray and sprinkle some chopped coriander. 


Quick Tips
  1. We made it in an air fryer that is a combo (toaster and air fryer). If using a standalone air fryer, adjust the temperature and time accordingly.

April 14, 2020

Yogurt - A Probiotics Boost For Your Health!


What do Red Mango, Pinkberry, Yoplait GoGurt, General Mills Natural Valley Yogurt Bars, Chobani, Oiko, Fage have in common? 

All of the above are YOGURT based products. 

Here are some reasons why eating yogurt is good for you:

  • It is a good source of probiotic cultures, which are good microorganisms that benefit our digestive system, boost immunity and help the absorption of certain minerals like calcium into our system.
  • Yogurt is a good source of protein, calcium, riboflavin, vitamin B6, zinc, and vitamin B12.
  • If eating plain yogurt doesn't sound pleasing, then give the following recipes a try. They are all healthy and gluten-free: 

Eggplant Raita (yogurt dip)
Other raitas or yogurt dips to try are EggplantBeetrootLongSquashSpinachTomatoesTomato and OnionBell Peppers, or Cabbage


One of my favorite rice dishes to eat as a child was daddojanam or seasoned yogurt rice. When I was 2 or 3 years old, I used to give her a hard time at mealtime. She used to make this dish, make yogurt and rice balls and feed me while I was playing. She used to sneak some veggies too. I was hooked since then...


My husband loves Dahi Vada. I like it too; it is vada soaked in seasoned yogurt. It tastes so good topped with tamarind chutney, coriander chutney and sev. 

Dahi Vada

Buttermilk is a more liquid version of yogurt. We use buttermilk to make Spinach and Potato Kadhi. It's nice to eat on its own or mixed with rice. 


 Do not be afraid to try new things. Try to incorporate yogurt into your diet. It is better for you in the long run.

Let us know how you enjoy eating yogurt. We would love to hear from you. 

January 29, 2012

Udupi's Frozen Mendu Vadas

Dahi Vada is an Indian chaat that is prepared with vada (donut-like shaped crispy lentil fritters) and yogurt. The vadas are made from urad dal and some spices for added flavor. Making vadas from scratch is a laborious process:
1) Soak the dal in water for at least 5 hours and blend it to a smooth consistency.
2) Mix in salt and other spices, press small portions of the dough into donut like shapes on your palm and fry them to golden brown color.
3) Soak the fried vadas in seasoned yogurt for couple of hours until they are ready to be served.

Although I was able to describe the process in a few steps, it typically takes about half a day to make this snack from scratch. And if you are pressed for time but still want to enjoy this delicious snack, then there is a solution. 


The solution is Udupi's Frozen Mendu Vadas. Udupi is another brand under the Deep Foods' Company.

On the Upside
- The vadas are fried and packaged, so there's no need to re-fry them.
- The vadas were moist and not oily. They were very flavorful and light.
- They also do not contain onion or garlic as it is noted on the package.
- The packet contains 8 pieces and costs about 2 USD; so it's reasonably priced. 

Downside
Currently available at Indian Grocers.


Below is how we prepared the Dahi Vada from the Frozen vada packet:
- 1 box Udupi Frozen Mendu Vada packet
- 16-20 oz of Yogurt
For seasoning:
- ½ tsp Whole Cumin seeds (jeera)
- ½ tsp Mustard seeds
- 2 Green chilies, finely chopped
- ½ inch piece of Ginger, grated
- 1tbsp Vegetable oil
- 2 tbsp Coriander leaves, finely chopped
- ¼ tsp Salt or as needed
Tamarind & Date Chutney for garnish

Procedure:
1) Whisk the yogurt and set aside. Heat oil in a small seasoning pan and add mustard and cumin seeds. When they start spluttering, add chilies and ginger along with a pinch of salt. Transfer the seasoning into the yogurt and mix well. 
2) Transfer the vadas from the packet into a microwaveable dish. Microwave them for 2-3 minutes with closed lid. Immerse each vada one at a time into a bowl of water. Remove it immediately from the water and squeeze the water out by pressing it between your palms. Then add each one into the seasoned yogurt. (Please Note: Make sure all vadas are in the yogurt and allow them to soak for at least 30 min. - 1 hour. 
3) Garnish them with chopped coriander. Serve each vada along with some yogurt in a small bowl and top it with a tbsp of chutney. 

Enjoy the coolness with tangy sweet taste!
***Quick Tip: If you prefer a less spicy taste, skip seasoning the yogurt.

Our conclusion: We would definitely recommend this product. The pros out way the cons. It's the perfect size for your family or get together. It saves time and lets you enjoy the rest of your day.

January 22, 2012

Daily Delight's Fresh Frozen Aviyal Mix

Ever since we ate Aviyal at Rajni Restaurant, I wanted my mom to try to make it at home. She found a packet of Aviyal Mix at Subji Mandi (Indian grocery store) last week and tried to recreate it. Aviyal is a mixed vegetable dish with a coconut and yogurt gravy sauce, originating from Kerala.

On the upside:
- All the vegetables needed to make this dish were included and they were straight from the source - grown and packed in Kerala.
- The cost of this mix was under 2 USD.


The packet contained fresh frozen pre-cut vegetables and spices found in a typical Aviyal dish: 
1-2 Drumsticks
50 grams of Elephant yam
1 medium-size Cucumber
50 grams of Snake gourd
50 grams of Long beans
50 grams of Carrot
1 small green mango
3 medium-sized green chilies
10 curry leaves

The only downside is that the packet didn't come with a recipe. Lucky for us, my mom is a genius. I cheered on as she did her magic.    

Below are the ingredients for the gravy:
12oz Yogurt
1/2 cup Coconut (fresh/frozen), grated
1 tsp Whole Cumin seeds
A pinch of Turmeric
Salt, as needed

Let's get started:
1) Empty the cut vegetables into a heavy-bottomed saucepan (3-5 Qt). Add 1½ cup of water, ½ tsp of turmeric, and cook until soft and firm.  Drumstick takes the longest time to cook, so make sure it is soft. Transfer into the serving dish and allow it to cool down.
2) Blend together grated coconut, green chilies, cumin, and approximately 1/3 of yogurt and a pinch of salt until it is a smooth mixture.
3) Add the remaining yogurt, blended coconut mixture to the cooked vegetables and mix well. For seasoning, heat a tablespoon of coconut oil on low heat and add 1/2 tsp mustard seeds, cumin, and red chili. when they splutter, add asafoetida and curry leaves. Stir 10 seconds and immediately transfer it into Avial and mix well. 
4) Serve it with warm rice or pooris.

Served hot over brown rice
***Quick Tips:
- The packet includes 3 chilies, use 2 if you prefer less spice level.
- On the packet, the serving size is listed as 3 but we found that after combining all the ingredients together, the dish is enough for 4-6.

Our conclusion: The dish turned out well and didn't require a lot of time since most of the prep work was done. Also, the spices included in the packet were packed separately to prevent any wetness or sogginess. We would buy this mix again.

August 31, 2011

~*Pani Puri Time*~


Our heart goes out to all the families that were affected by Hurricane Irene. We hope that in time all will settle down and life will go on. 

We weren't sure how we would be affected by the storm, so we kept cooking to a minimum and munched on snacks. 
Dahi Pani Puri
One of my favorites is Pani Puri. I love pani puri because it's easy to assemble and fun to eat. You know the Pringles jingle, “Once you pop, you can't stop”. That's how I feel about this snack too! It’s so delicious and because it’s a light but filling snack made with healthful, all natural ingredients. You can eat loads at a time without feeling guilty. Also did you know, Pani Puri is an inexpensive and popular snack found all over India?  So have a puri, or two or three and be MERRY! 

Ingredients for this popular snack include:

Potato, canned chickpeas/garbanzo beans, pani puri masala, tamarind-date chutney and bite size puris
Procedure: Microwave the potato for 2 to 3 minutes or until thoroughly cooked. Drain and wash the chickpeas. Then mash the potato and chickpeas together to a granulated mixture. Next, dilute the pani puri masala with water to your desired tangy taste (tamarind-date chutney may be mixed in for a bit of sweetness). Now you are ready to enjoy the pani puris. Insert a hole into the puri without breaking through it completely. 

The Puri never had a chance!
Then scoop a bit of the potato and chickpea mixture into the puri and fill it up with the pani puri masala liquid (also known the "pani"). Next, quickly put the whole puri inside your mouth and crunch away. Hint: Don't eat the puri in two bites because all the stuffing will fall apart and you'll create a mess. Make sure to eat the puri in one go (as illustrated above).


***Quick Tip: 
- Alternately if pani puri masala is not available, the combination of tamarind and coriander chutneys and diluted plain yogurt can be used.
- For a more tangy or chatpata taste, sprinkle chat masala over the potato and chickpea mixture. 

November 16, 2010

Daddojanam - My Favorite Childhood Dish


Question of the day: What is your favorite childhood meal or dish?

Feeding time was always a challenge for my mom. I'm sure most new moms and experienced ones would agree; especially for toddlers versus any other age group. My mom told me that whenever she cooked something for the night, I never ate it. I would just runaway and be a menace. After many such days, she couldn't take it anymore and tried something different. She started to feed me yogurt rice (plain white rice mixed with homemade yogurt). Now that may sound awful to some people who don't eat yogurt to begin with. Well,what can I say except that it worked. Slowly she added vegetables to the mixture and that's how I got my nutrition.

When I told my mom I was going to share the recipe of my favorite meal, she thought that it wasn't anything special. Oh, was she wrong! See, yogurt rice doesn't sound fancy but it's the revised version that I find more scrumptious these days. Think of it as an upgrade. It's called Daddojanam and it's mixed with spices that make it taste different. We always serve this along with our other dishes for family parties. My mom tells me that the guests enjoy eating daddojanam after eating anything spicy because it refreshes their palate and calms the stomach.

By the way, we served this at the Diwali Dinner and it was gone by the end of party. Guess who ate most of it? ME...if you haven't guessed it by now. 

Daddojanam 
(Popular in Andhra Pradesh)

Ingredients (for 4 servings) 
1 cup Plain Rice (white or brown)
1 cup Plain Yogurt
1/4 cup Sour Cream (Regular or Non-Fat)
2 to 3 Tbsp Milk
Half Cucumber or Carrot (optional), grated
A pinch of Salt, for taste

1/2 tsp Mustard
1/2 tsp Jeera
A pinch of Turmeric (optional)
1/2" Ginger, grated
1 Green Chili, chopped
1 to 2 Tbsp Oil
5 Curry Leaves, fresh or dry (optional)

Procedure
1) Cook rice to a slightly softer grain so that it can be mushed easily after done. (Hint: easier to do when rice  is hot)

2) Mash the rice and mix in yogurt, sour cream and some milk and mix well until the mixture is somewhat liquidity.

Seasoning:
- Heat some oil (1-2 tbsp) and add jeera and mustard. When they splatter, add green chillies, ginger, salt and curry leaves. Stir for few minutes until the leaves are crisp.


3) Transfer the seasoning into the rice mixture and add salt as needed and mix well.


4) The dish will taste better if it is allowed to stand for 2-3 hrs. If you have more time, leave it in the fridge overnight.

Quick Tips:
- This dish can also be made by using cooked Quinoa, rice noodles or vermicelli.
- Additional milk or sour cream can be adjusted to your desired consistency.
- 4 to 5 cracked black peppercorn can be used as a substitute for green chilies.

August 20, 2010

Tater Tots Revived - Not Just 4 Kids!

My last entry about "Hot Summer Treats" featured this snack called Aloo Papdi Chaat that I have tried at many restaurants but I never liked it as much as when I make it at home. The ingredients are fresher and everything is still crispy when you are eating it.

Well today, I've got another treat for you to try. It's called Aloo Tikki Chaat and the main ingredient is none other than TATER TOTS!!


You're probably thinking, "is she crazy, those are for kids". Well, I'm not and they are perfect for this "off the street" snack. I say it's off the street because in India, specifically in Delhi and Bombay, there are street vendors that make this hot off the grill and serve it up with different sauces and people go crazy for them. You don't have to go to India to enjoy this snack, I will show you how to make it in the comfort of your home.


In the Aloo Papdi Chaat snack, you had to add crispy bits to make it more crunchy. For this recipe, you don't need to add those because you will use baked tater tots which you can make as crunchy as you want.
 

Here are the ingredients from left to right: Chaat Masala, Tamarind Chutney, Coriander Chutney, Yogurt, and Tater tots (or you can use Mini Potato Patties).  

Procedure:
1) Thaw the contents of the tater tots bag and place them in a greased baking sheet. Follow the baking instructions listed on the bag. If you want them to be a bit more crunchy, leave them in longer.  
 
(Hint: Make sure they do not get burned)
 
2) Take 5-6 tater tots or patties off the sheet and mash them up on a plate with a fork.
 

3) Dilute the chutneys with a little bit of water before adding to the potato mixture. Most of these chutneys are concentrated so they will have a strong taste. Adding water to them will tone the taste down and won't clump up your snack.

4) Next add yogurt to the mixture, and then sprinkle chaat masala and sev on top. The recipe is now completed.


I now present this scrumptious snack to you. Go enjoy it. Savor every last tot morsel.

***Quick Tip: Two of the ingredients in this recipe (such as tamarind and coriander chutney) are already found in most Indian households because they are used as condiments for other snacks and dishes. They are like ketchup or mustard sauce for American food.

August 11, 2010

My Hot Summer Day Treats!

It seems to me that as the years pass, the summers are just getting hotter and sometimes more humid. Well to beat the heat, I relax with some cool treats that are easy to make. It's just the matter of the ingredients you have around.  My favorite treats for hot days are Aloo Papdi Chaat and Roohafza Milkshake. You are probably wondering, what is she talking about? The best way to describe Aloo Papdi Chaat is that it is like potato salad (with some dry and wet ingredients).

This is what Aloo Papdi Chaat looks like:

Isn't it so colorful?

I know you are dying to know how to make this, so let's get started. Before we begin, let's just see if you can identify any of the ingredients in the picture below?


Here are the ingredients, if you haven't guessed already (from left to right): two medium sized boiled potatoes, coriander, chaat masala, Tamarind chutney, chopped onions, diluted plain yogurt, and papdi pieces. Once you have these, it's just a matter of mixing these together. I know you can't tell in the finished picture above, but the potatoes were chopped into 1/2-1 inch pieces.

Next up is Roohafza Milkshake...I'm getting cravings just thinking about it. It's so creamy and yummy. You know, as a kid I used to mix the Roohafza syrup in water and drink it with some ice. I think I also froze the juice in the ice cube trays and eat it like the Italian Ice back home.


As you can see, half the bottle has been finished because it is THAT GOOD!!

What is Roohafza? I used to think it was Sugary Rose Syrup. I mean it tasted like it so I never questioned its origin. I'm reading about it now and it's fascinating the ingredients that are found in this syrup. It is infused with essences of Rose, Coriander Seed, Watermelon and various other flowers, herbs and fruits.

The breakdown of ingredients in my milkshake:

One banana cut up into pieces, half cup to cup of milk, 2-3 tablespoons of Roohafza and as much crushed ice as you want. The only thing left to do is blending and taste testing. You can add more banana if you want it really thick but then you may add more Roohafza to sweeten it up. You have to play around with the ingredients to get Your Perfect Blend.


This blend will get you a little over a 8 fl oz serving. I poured the milkshake into a Scotch glass to feel fancy. Enjoy the drink however you like. It's cool and refreshing!!

Interesting Fact#1: Rooh Afza is traditionally made in preparation for breaking the fast during Ramzan, the holy month of fasting for Muslims. Happy Ramzan to all my friends!

April 18, 2010

Not Your Everyday TOFU!!


I made some mango milkshake to eat with my tandoori tofu. It is a good blend of sweet and spice.

I have tasted my share of different kinds of Indian curries before and let me tell you this...most of the ones you eat at North Indian restaurants like Chicken Tikka Masala and Chicken Makhani...tend to taste the same to me. They both have similar tomato based gravies that were cooked with the chicken. Been there, done that. Now for someone who is vegetarian, these curries wouldn't even be appealing. So what would they eat? Vegetarians I have chatted with have told me about Tofurkey and Tofu burgers which have the firmness of meat but are made from Tofu and seasoning.
You know, that stuff still sounds Bland to me. I need flavor and spices. I'm not saying, I'm a full fledged Hot curry eater, but I like taste in every bite. My parents are vegetarian and they are always looking for ways to "spice" up their cooking with Indian and American ingredients. My mom decided to make Tandoori Tofu curry to eat with naan (Indian bread). I've had Tandoori chicken at restaurants where the chicken was marinated with the Tandoori spices and grilled, then served with onions and chilies...if you dared to eat them RAW!! We took the concept of mixing the Tandoori spices and marinating them with Tofu. The tofu sucked up all the juices from the Tandoori mixture and when eaten with naan, it was like I was swimming in a pool of flavor. The best part is that it fills you up and it's good for you.

I couldn't wait to share it with everyone I knew...Hey, don't take my word for it, make it at home and let me know how it came out.


Tandoori Tofu Curry:
- 12oz (340g) of **Tofu (steak style, seasoned) 
- 2 tbsp Tandoori Paste
- ½ cup Tomato puree
-
1 cup plain yogurt
-
1 Medium Onion, chopped finely
-
1 tsp of Ginger garlic paste
-
2 tbsp Oil, for cooking
-
1 tbsp of Fat- Free Sour Cream, optional
-
2 tsp Salt (to taste)
-
½ tsp of Red chili powder
-
1 tbsp of Coriander (Cilantro), chopped and used for garnish

Procedure:
1. Remove tofu from its packing and drain the water well. Cut the tofu block into 1-1.5” cubes.
2. In a mixing bowl add yogurt, tandoori paste and mix well. Add the tofu pieces into the bowl and using a flat silicone spatula cover the mixture onto tofu. Marinate for 30min to 1hr.
3. Heat the oil in a saucepan on a medium flame. Add onions and sauté until they are golden brown, then add ginger garlic paste, chilli powder and mix well for 1min.
4. Add tomato puree and mix the mixture for 2-3 minutes. Transfer the tofu along with the yogurt into the pan, add salt and cook for 7-10min until the gravy thickens.
5. If you want to add more color, you can add frozen carrots and peas mix to the curry while its on the stove. Just before removing from heat, add some sour cream and mix well. Do not over mix the curry as the tofu pieces may break.
6. Transfer the curry into a serving dish and garnish with coriander.
7. Serve the curry with naan, rotis or rice for a delicious, nutritious and scrumptious meal. Side additions of raw onions and green chilies will go well with roti or naan (typical north Indian style).


Quick Tips
Please Note: Tofu Steak can be found in the cut fruit and veggie section of Shoprite. In case the tofu steak variant is unavailable, use the extra-firm type to avoid breakage of pieces


April 4, 2010

Boring Soup No More - South Indian Kadhi

Ever since we went to Vatan for dinner last month, I have been craving Buttermilk and Spinach Soup or Kadhi (The Lazy Man's Buffet). This 'soup' is famous all over India and can be made in different ways. I love the way my mom makes it because it can be eaten by itself or with plain rice and papad, plus it is healthy. I'm always trying to eat better but without subtracting the Taste. If you are like me, you don't have to worry about it with this recipe. It has plenty of taste.

My dad and I are going to make this dish tonight. It will be ready by the time my mom arrives from the airport. I have the recipe that she left me in case I wanted to make it. If you want to try this at home, please keep in mind this recipe makes 6 servings (1 cup/serving).


Ingredients for Buttermilk and Spinach Soup (South Indian Kadhi):

Buttermilk - 1 quart / 32 fl oz / 945 ml
Frozen chopped Spinach - 2 cups
*Gram flour (Besan) - 1/4 cup (see quick tips)
Potatoes - 2 medium
fresh Ginger - 1 tbsp, grated
Turmeric powder - 1/2 tsp
Salt - 1 tsp
Red chili powder - 1/2 tsp

Seasoning (Taalimpu):

Vegetable Oil - 2 tbsp
Whole Cumin Seeds (Jeera) - 1 tsp
Mustard Seeds (Rye) - 1 tsp

Asafoetida (Hing) - a pinch 
Garlic cloves - 6 finely chopped
Curry leaves - 8-10 leaves
Red chili powder - 1/2 tsp (or as per taste)


Procedure:


1) In a 3 Qt multi-pot or casserole, mix gram flour and half cup of water until it becomes to a smooth liquid without any lumps

2) Add buttermilk and mix well.


3) Microwave the potatoes for 5-6 minutes until cooked and soak them in water to stop cooking. Remove the peel, cut into 1-inch cubes, and set aside.

4) To the mixture add spinach, potato cubes, ginger, turmeric powder, and chili powder and then mix again.


5) Bring the soup to a boil on Medium-Low Heat and continue mixing intermittently. Next reduce to low/medium heat and then boil it for another 4-5 minutes.

6) Remove from stove, add salt, and again mix well. Please put aside for now.

7) To make the seasoning, add oil in a small sauce pan, and heat it on medium. When heat is felt to the palm held over the pan, add mustard and cumin seeds, and then allow them to splutter. Immediately, add garlic and fry for 2 minutes or until golden. Remove from stove and add Hing powder and curry leaves.


Mix it well and pour it over the soup.


8) Serve 1 cup hot soup over 1/2 cup cooked plain rice and enjoy it with crunchy papad or even potato chips. For added taste, add a teaspoon of ghee (melted butter) to the serving. Papad can be toasted in the microwave for 30-40 seconds depending on size.


***Quick Tips
- Please note this soup can be made with either spinach or potato or both of them. Use 2-1/2 cups of spinach or 4 to 5 medium potatoes for 6 servings when used individually.
- You can use whole milk yogurt instead of buttermilk as well. 
- If you want to eat the South Indian Kadhi like soup use 1/3 cup besan; otherwise use 1/4 cup if you want to eat with rice.